This is a blog post to accompany a webinar series we recently launched titled Top Tips for Driving More Value with Video. The sessions highlight 10 advanced ways to make sure you're providing high quality video experiences efficiently and effectively. Below are some excerpts from the presentation, but be sure to sign up for a session to get access to the rest of the great information.
Quality matters. In fact, a 2011 study from IDC identified playback quality as the most important factor for keeping viewers around longer. In short, a higher quality playback experience translates to increased engagement, and a lower quality experience causes viewer drop-off.
Video Cloud’s ingestion and transcoding process was designed to help publishers provide the highest quality video experience possible while doing minimal legwork, and in that regard it is very successful. At the same time, there are a few tips and tricks available to all users that can help make your videos even more engaging.
Preserving the Source File as a Rendition
When you upload an asset to Video Cloud, it goes through a transcoding process that also generates up to six different renditions of the video in varying resolutions, bit rates, and file sizes. Video Cloud players will analyze your viewers’ internet connection quality during playback and automatically serve them the highest quality rendition they can handle without long load times and rebuffering events.
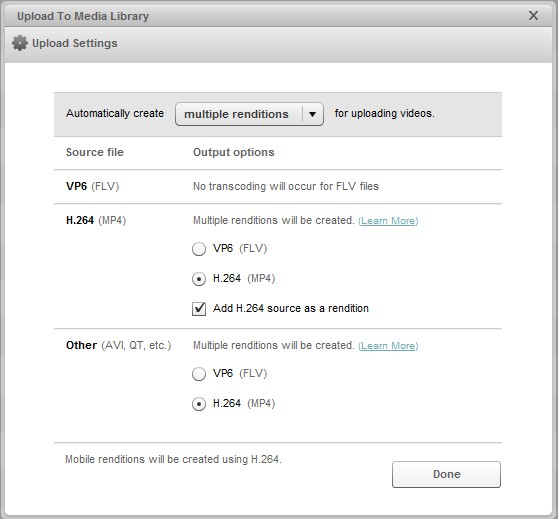
One little-known feature of the Video Cloud Studio is the “preserve source as rendition” setting, seen below. If you’re uploading a .mp4 file encoded in H.264 with this setting enabled, we’ll keep the source file available as a rendition available for playback. This means you can have the 6 renditions Video Cloud created for you, plus your source file available for stunning HD playback for your viewers with strong enough internet connections.

Create High Quality Image Stills
The first thing viewers see when they arrive at your video content is an image still. You can customize the image still using Video Cloud’s Preview and Capture tool, but many users don’t realize that the image is captured from the rendition you’re previewing. This can result in a grainy, poor-quality still image that may discourage viewers from engaging even before they click play.
Simply making sure you have the highest rendition selected during the Preview and Capture process will result in significant improvement in image quality, increasing the chances that site visitors who see your thumbnail will decide to engage with your video.
Resize Players to Eliminate Letterboxing
Almost all Video Cloud players can be resized to fit any video aspect ratio or a specific spot on a web page. Making sure your video player fits the aspect ratio of your content goes a long way to providing a clean, professional experience on your website that echoes the values of your brand.
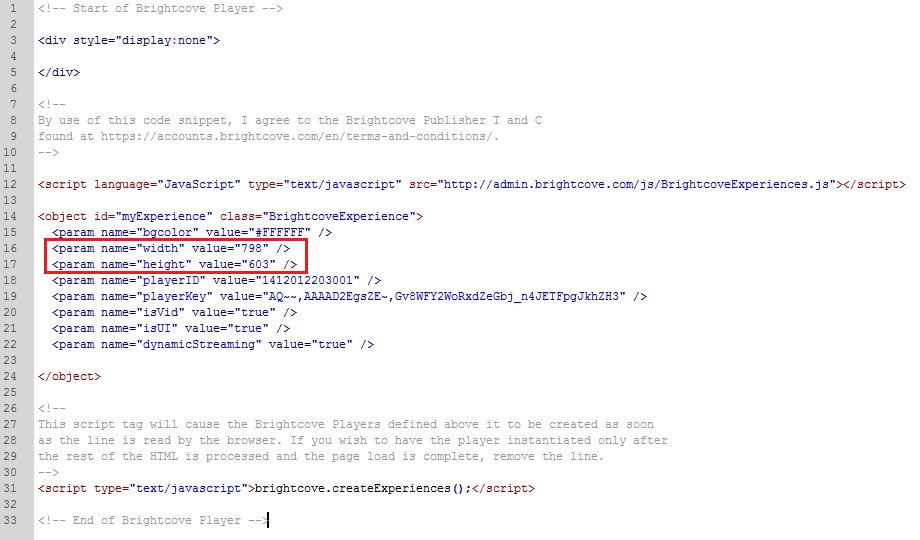
Resizing players is easy – you just need to do so via the player embed code rather than through the Studio UI. I’ve highlighted the parameters that control the player width and height in the screenshot below. If you’re using a player template that has elements other than the video window, you can reference our player templates support document to figure out the size of those elements.

To see these tips in action and to learn additional tricks that will help you manage content more effectively, publish assets more easily, and make video harder for you, be sure to sign up for a Top Tips for Driving More Value with Video webinar here.

